Sections in this article:
- User Roles at a Glance
- How to Add a User
- Extra Settings for Sub-admins
- Extra Settings for Admins
- Calendar View Only Users
- After You Add a User
Event Scheduler has four user roles: User, Sub-admin, Admin and Calendar View Only. Each person sees events only for the locations you give them access to.
If someone only needs to see the calendar and won't add events, make them a Calendar View Only user. Learn more: Giving Staff Members Access to All Events in eSPACE | Calendar View Only Users
Overview of Different User Roles
1. User
Main Role: Add events, run reports, and see all events on the internal calendar
- Can create events (events go to pending status)
- Can edit/delete, or cancel occurrence/event only if they are the owner of the event
- No approval rights
- View the calendar
- Create reports
- No "Settings" section on left sidebar
- Can be given permissions to view and even edit Floor Plan
2. Sub-Admin
Main Role: Ability to approve items on events in their approval area
- Can create events
- Can edit/delete, or cancel occurrence/event, only if they are the owner of the event
- They can approve or decline items (spaces, resources, services) within their "Area of Approval"
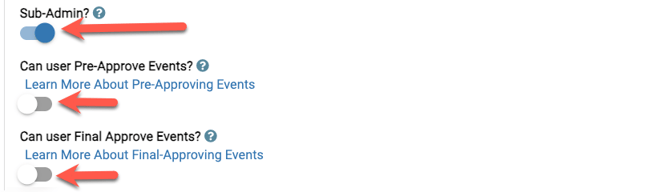
- If Pre-Approval or Final Approval settings are selected, Admins can grant Sub-Admin(s) these permissions within "User Access Permissions"
- View the calendar
- Create reports
- No "Settings" section on left sidebar
- Can be given permissions to view and even edit Floor Plan
3. Admin
Main Role: Manage all account settings, users, and oversee approval flow
- Can create events
- Can circumvent entire workflow process by choosing "Auto Approve"
- Can edit/delete, approve/decline, cancel occurrences/events, resolve conflicts and override closures
- View the calendar
- Create reports
- Has access to the "Settings" section to set up their organization, assign user permissions and more
- Can choose "Pre-Approval" and/or "Final Approval" settings and select Admin(s) and/or Sub-Admins accordingly
- Can add billing contacts (must be Admin)
- Establishes workflow for the organization through the "Settings" section
- May override and circumvent workflows
- User permissions may look different based on your account plan (ex: Billing and Invoicing Admin is only shown, if you have subscribed to Billing and Invoicing).
- Only Admins can also be given access to the billing information in eSPACE. To do so, you must first give them admin access, click Save and then you will be able to give them access to billing/make them a billing contact.
- Can be given permissions to view and even edit Floor Plan
4. Calendar View Access Only
Main Role: View Public and Internal Events Only
- When this user logs in, they are directed to the internal calendar and can view the calendar only. They will still be able to switch between the different calendar views, print the 2 Week, Monthly, Agenda, and Condensed Views as well as use the same filter settings on the calendar views as other user levels.
- No access to left side menu bar and NO access to Floor Plan
How to Add a User
Only admins can add users. These steps are the same for every role; the role you pick in step 4 decides what else you'll see.
- Go to Settings > Basic > Users.
- Click Add New User.
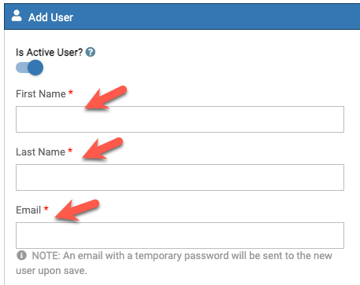
- Fill in the required fields: name and email address.
-
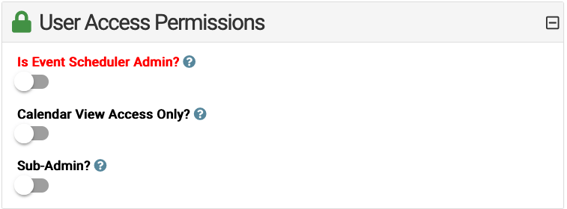
- User: leave the role toggles off. Everyone starts as a User.
- Sub-admin: turn on Has access to the Event Scheduler and Sub-Admin, then see Extra Settings for Sub-admins.
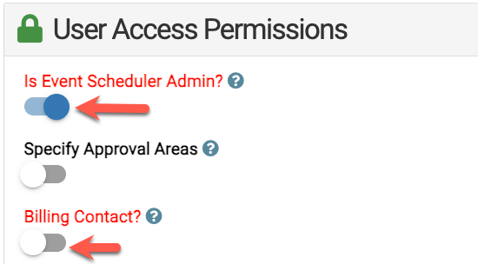
- Admin: turn on Is Event Scheduler Admin, then see Extra Settings for Admins.
- Calendar View Only: turn on Calendar View Access Only, then see Calendar View Only Users.
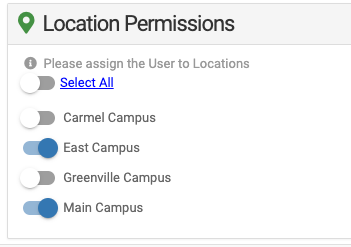
5. Under Location Permissions, turn on each location whose events this person should see. Choose at least one.
6. Click Save.
Floor Plan access
This option appears only after the user is saved. Edit the user again, then choose view access or edit access to Floor Plan. Calendar View Only users can't have Floor Plan access.
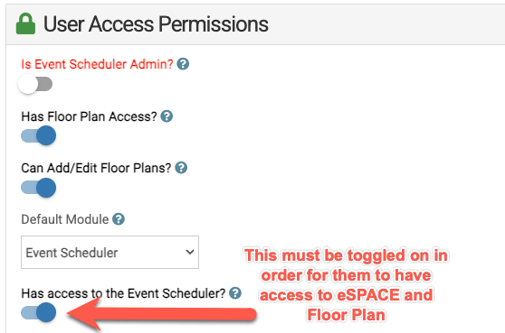
IIntegration access (HVAC, door access, digital signage)
I If your subscription includes COOLSPACE, SECURESPACE or INFOSPACE, edit the user and turn on the integrations they can use. This lets them set overrides on their own events. To manage the full integration module (FACILITeSPACE), the person must also be an Event Scheduler admin; grant that under Settings > Users in the FACILITeSPACE module. If you add an integration later, come back and turn it on for each user who needs it.
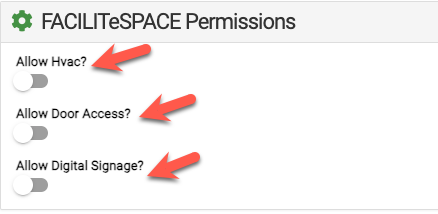
Extra Settings for Sub-admins
A sub-admin approves the spaces, resources and services in their approval area. After you turn on the Sub-Admin role, set these:
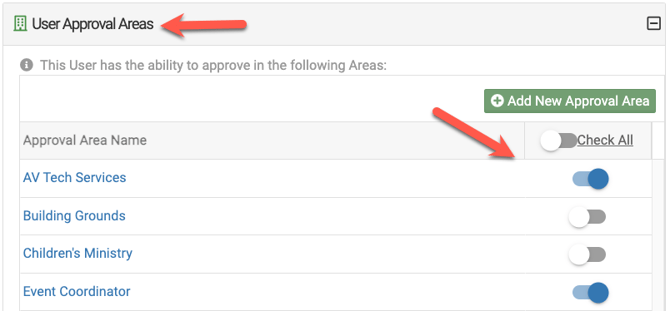
- Approval Areas (required): Choose the approval areas this sub-admin will manage. They'll approve or decline items on events only in these areas. Learn more: Approval Areas
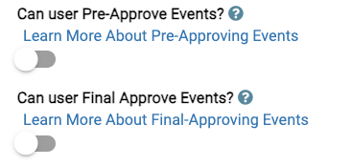
- Pre-Approval and Final Approval (optional): These options appear only if your organization uses them. Turn them on if this sub-admin should pre-approve or final-approve events. Learn more: General: Pre-Approval Process · General: Final Approval Settings
- Limit pre-approval to certain event categories (optional): If you give pre-approval, you can turn on Is User Restricted to pre-approve certain Event Categories. Then click in Category Restrictions and choose the categories they can pre-approve.
Next, be sure to assign the Approval Areas that you want the Sub-Admin to manage and approve items (Spaces, Resources, Services) within.
- Read about creating Approval Areas: Approval Areas
Extra Settings for Admins
An admin manages your account settings, users and approval process. After you turn on Is Event Scheduler Admin, these options appear:
- Billing Contact: Lets this admin see billing and manage your eSPACE subscription. Save the user as an admin first, then edit them to turn this on. The main billing contact is still the person listed on your billing page.
- Pre-Approval and Final Approval: These appear only if your organization uses them. Turn them on if this admin should pre-approve or final-approve events.
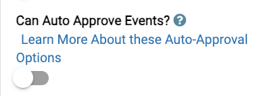
- Can Auto Approve Events?: Gives this admin a checkbox on the Details tab when creating an event. Checking it approves the event right away and skips sub-admin approval.
- Default Auto Approved On?: Every event this admin creates is approved automatically, without sub-admins reviewing their items. Use this one carefully.
Calendar View Only Users
A Calendar View Only user can see public and internal events but can't add or change them. It's a good fit for staff who just need to know what's happening in the building.
- When they log in, they go straight to the internal calendar. They don't have a dashboard or the left side menu bar, and they can't use Floor Plan.
- They can switch calendar views, use the same filters as other users, and print the 2 Week, Monthly, Agenda and Condensed views.
- They can't see all the setup details on events.
To add one, follow How to Add a User and turn on Calendar View Access Only in step 4. Then choose their locations and click Save.
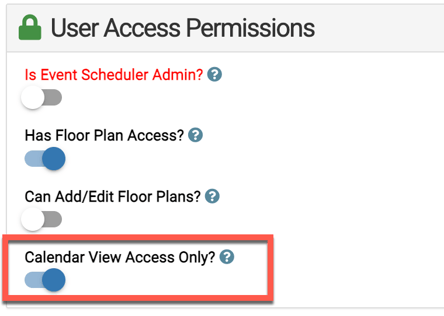
* Despite the setting for Floor Plan appearing, Calendar View Only does not have access to Floor Plan.
New User Email Invite
After any new user has been added, an automated email with a temporary password will be sent to the new user.
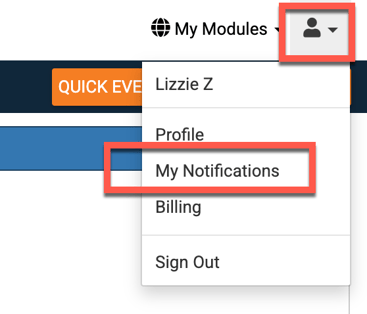
Once they log in with their temporary password, they should go to "Profile" as shown in the attachment below to update their password, then SAVE.
After You Add a User
Welcome email: eSPACE emails each new user a temporary password. After they log in, they should go to their profile icon > Profile, set a new password and click Save.
Email notifications: Each person chooses which eSPACE emails they get under their profile icon > My Notifications > Notification Preferences. Learn more: Notification Preferences in Event Scheduler