
Brivo Device Compatibility
- Please note that this integration is only applicable with Brivo Doors with nodes and not readerless doors. For any questions regarding this, please contact Brivo Support at technicalsupport@brivo.com.
Prerequisites
Confirm that your organization has SECURESPACE added to your subscription (a sub-module of FACILITeSPACE). This module allows events that are fully approved in Event Scheduler to schedule your Brivo doors, therefore Event Scheduler is also required on your eSPACE subscription in order for this integration to work. An admin with billing permissions in eSPACE can confirm or add both of these modules if needed under Settings > Other > Billing > Manage.
-
- A. When you add the doors integration to your subscription, there is a 1-time setup fee and an on going subscription charge.
- B. In order to know if this feature is included in your eSPACE subscription tier, please contact support@espace.cool.
- C. It is your responsibility to confirm and agree to any additional pricing that Brivo may include for their role in this integration.
Switching to the FACILITeSPACE Module
1. After Brivo has been added to your subscription and you have had support configure your account on the backend for the integration, log into your eSPACE account and click on My Modules and select FACILITeSPACE.
- Only the admin with billing access who initially added COOLSPACE to the subscription will be granted immediate access to the Building Automations, but they can give access to other admins.
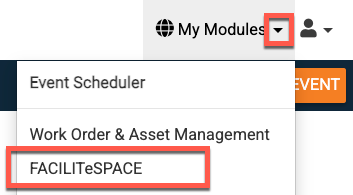
Once in the FACILITESPACE module, you can switch back to another module by clicking on the arrow next to the eSPACE logo and selecting a different module.

Integrations Dashboard
2. On the Dashboard, you will see the list of upcoming events and once your doors are synced and assigned to spaces and those spaces are reserved on approved events, you will be able to tell which events will affect doors or not.
-
After you set up the integration, read the section "Viewing Events that will Affect Doors" for more.
Syncing & Assigning Spaces to Your Thermostats in eSPACE
3. Once in FACILITeSPACE, click on Integrations in the left side menu bar to expand the options and select Brivo.

On that page, you will see the credentials that are needed from your Brivo account in order to connect eSPACE to Brivo for scheduling.
Contacting Brivo For Integration Information & Activating your Account
4. In order to get the information that is needed to actually link eSPACE > FACILITeSPACE >SECURESPACE to your Brivo doors, you will need to obtain information from Brivo to enter into your FACILITeSPACE account. To assist with this request, you may elect to copy and paste the following into an email to your Brivo contact:
- “Hello (Brivo Salesperson), We are a Smart Church Solutions/eSPACE customer and we want to integrate our Brivo doors with our eSPACE account. We need a quote for the Brivo API and the form that we need to fill out (as provided by Brivo) so we can send it to BrivoAPI@brivo.com. Then we need to have the Brivo API activated on our Brivo account. Can you please help me with this? Thank you!”
5. Once Brivo activates the API on your account, they will send you an email with the API Key. This key is the first part of the information that you will need to copy and paste into the Credential Setup under your FACILITeSPACE/Access Control/Brivo Doors Setup.

The following steps must be done in the primary admin OR Super Administrator account in your organization's Brivo account
- For questions about who has the primary admin account, please ask support@brivo.com
6. For the client ID and secret, you will need to create an application within your Brivo account.
- A. Click on the Marketplace in your left side menu bar and then click "Generate API Token" on the far right side of your Brivo account.

- B. You will need to provide a name and description for the application.

C. Set the authorization grant type.
- For the Application Type please select "Password".

-
D. Then save the application.
-
E. Under Enabled you will see your new application listed.
- F. Click on the application to view the client ID and secret.

-
*If you do not see this Integrations page you will need to have the API activated on your account.
- If you need help with the API key, client secret, and/or client ID please reach out to brivoapi@brivo.com for assistance.
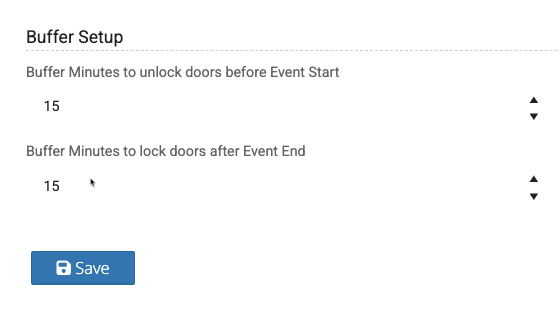
Setting Global Unlocking & Relocking Buffers
7. After typing in the credentials for your FACILITeSPACE account to link to your Brivo door account, you can set a global “Buffers” that will apply to all doors. This "Buffer" will send the "unlock" and "Return to Internal Brivo Scheduler" commands X min before the start time and x min after the end time.
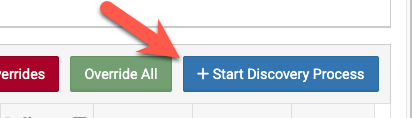
Importing Doors from Brivo into FACILITeSPACE
8. You are now ready to click “Start Discovery Process”, which will import all of the doors on your Brivo account into FACILITeSPACE.
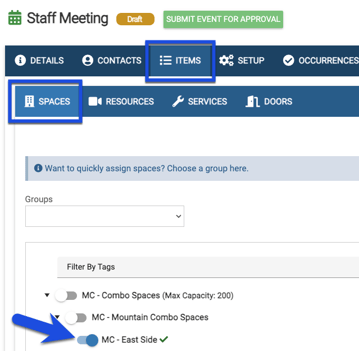
Assigning Spaces to Doors
9. To assign spaces to doors, click the Edit Space button to the right of each door name. You can choose as many spaces as you would like. The goal in assigning spaces to doors is to think through "If this space was scheduled on an event, what doors would need to be unlocked?". 
-
If you need to, you can remove spaces from doors in FACILITeSPACE and when you do, you will see a pop up message that asks you if you want to unassign that door to all events it is currently scheduled on.
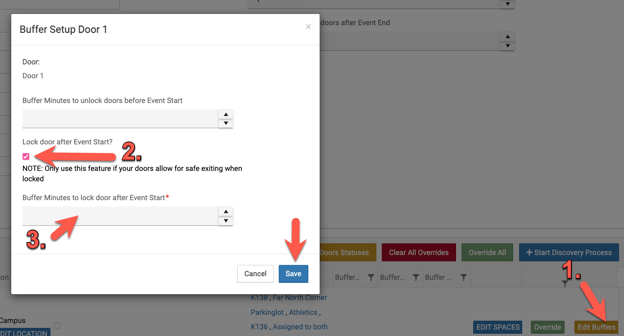
Setting Individual Door Buffers
10. Once the doors are synced in, you can assign an individual buffer per door. Once a door has an individual buffer, it will ignore the global buffer set at the top of the FACILITeSPACE Access Control/Brivo page. When setting an individual buffer you can decide for the door to "Unlock" x min before the start time of the event and either A. "Return to internal Brivo Schedule" x min after the end time or B. "Return to internal Brivo Schedule" x min after the start time of the event.
A.
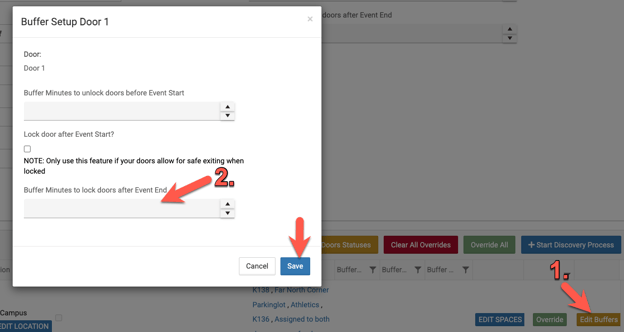
B.
Viewing Events that will Affect Doors
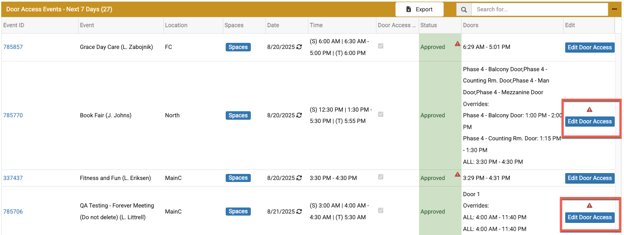
11. While all upcoming events will show on the integrations dashboard, any events with spaces that are assigned to doors will show without a red triangle icon. Any with a red triangle icon means that doors will not be affected and thus eSPACE won't schedule doors for that event. This is because no spaces on the event are assigned to doors. 
For any event that will affect doors, you will be able to click "Edit Door Access" and create an door override to specifically state when you want eSPACE to push the "unlock override" command to your doors for the event.
Once there is an override, a red triangle will appear above the "Edit Door Access" button on the event.
Giving Others Access to the Door Integration in eSPACE
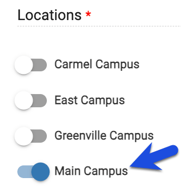
12. On the user page, click the edit icon for any user and then under the FACILITeSPACE Permissions section, you can enable access to SECURESPACE for them. You can also select which locations they need to be able to manage via the integration.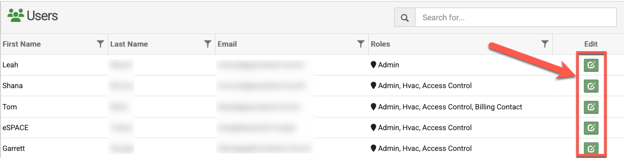
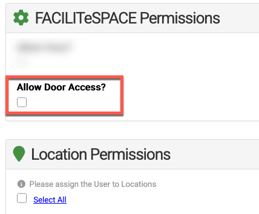
Once checked, click "Save".
Assigning Doors to a Location
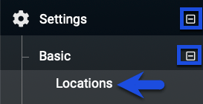
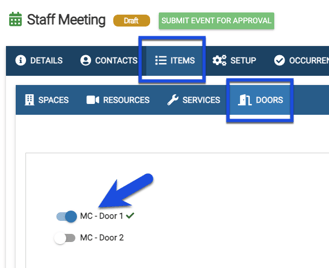
13. In order for the right doors to appear on the Items > Doors Tab on events in Event Scheduler, they must be assigned to a location in your account under Settings > Basic > Locations.
-
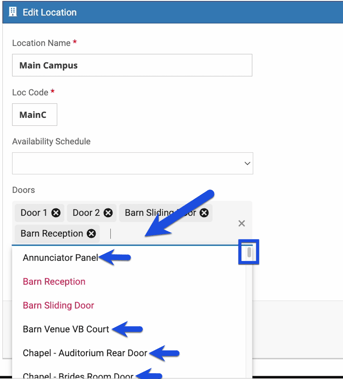
A. To assign them to a location, click the edit icon for that location.

-
B. Then click inside the "Door" field to start selecting doors. If your eSPACE account has one location then you can assign all the doors to that location.
-
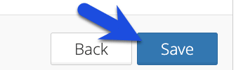
C. After selecting all the right doors for that location, click Save at the bottom right side.
How Doors Are Automatically Scheduled By Events
14. Once doors are assigned to their location if A. that same location is chosen on the Details tab of an event and B. a space is chosen on the Items > Space tab, then C. based on how you assigned spaces to doors in FACILITeSPACE, doors will automatically be selected on the Items > Doors tab.
A. Details Tab
B.
C.
Door API Calls
15. This integration checks every 2 minutes to see if there is a new schedule to “push to the doors”. It is a “live push”, so it is not limited to a certain amount of event schedules into the Brivo doors.
Schedule Logs for Doors in eSPACE
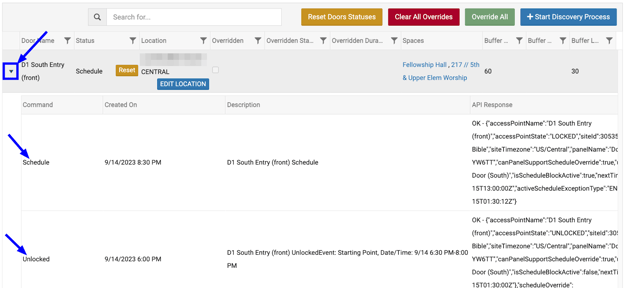
16. In order to see the door logs in eSPACE to confirm that eSPACE tried to send the “unlock” and “relock” commands go to FACILITeSPACE>Access Control > Brivo Door Setup and click the plus symbol to the left of any door (you may sort the logs by time by clicking in the empty space of the “Created On” column).
Overriding Doors on Events
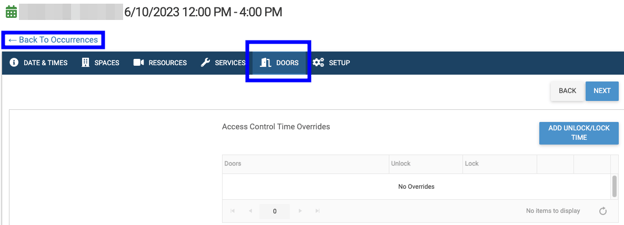
17. On the Items > Doors tab is where you can manually add or remove doors and add an override unlock and lock time. You can add one or multiple unlock and lock overrides to the event.
You can place an override on the main Detail tab of the event or go to the Items > Door tab to do so.
- Copying an Event: Door overrides for events are considered event specific so they will not copy over if you copy the event.

- You can also set overrides for doors on events on the FACILITeSPACE dashboard. From the dashboard, select "Edit Door Access" to either turn OFF door access or set an override.

Override for an Individual Occurrence
- If you need to override the doors for a specific occurrence on the event, go to the Occurrence tab on an event, expand the one that you need to edit, then click "Edit Services" and switch to the doors tab and add the door override that you need. Finally, click "Back to Occurrecnes" and submit the event for approval.

NOTE: Door access cannot be controlled for events that cross a 24-hour period in eSPACE (where the start date/end date and/or setup date/end date on the Details tab are different dates).
Preventing Doors from Being Scheduled by an Event
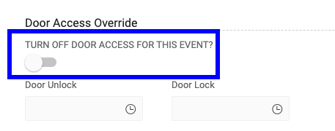
18. On the main Details tab of an event, you can also "Turn Off Door Access for this Event" and thus NOT have eSPACE unlock and relock the doors for that event.
Immediate Override for Emergencies
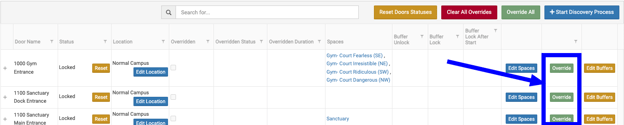
19. In the event there is an organizational emergency and you need to lock one, all or some doors, you can go to the FACILITeSPACE > Access Control > Brivo Door Setup and either click "Override" on individual doors or "Override All" and then choose a status and duration of the override.

Location
Whether you have one or more locations, because locations are the foundation of every eSPACE account, doors must be assigned to their proper location under Settings > Basic > Locations in Event Scheduler in order for this integration to work properly.